- October 28, 2019
- Posted by: SmallBusiness
- Category: QuickBooks Desktop
If your business is required to collect and pay sales taxes, you can use QuickBooks’ tools to help you meet those obligations.
Next to payroll, state sales taxes represent probably the most complex element of your accounting tasks. QuickBooks can help with the mechanics, but there’s a lot you need to learn before you can start charging and paying them. For example:
- Is your company located in a destination-based or origin-based state where taxes are concerned (do you charge sales tax based on where your customers are or where you are)?
- Certain types of items and services are exempt from sales tax. Are yours?
- What local taxes (city, county, etc.) must you collect, if any?
- How often must you submit what you owe, and to what agency?
If you don’t know your state’s rules, search for your Department of Revenue (sometimes called the Department of Taxation) on Google. Or talk to us about this whole complicated process. You can’t begin to work with sales taxes in QuickBooks until you know the answers to many questions.
First Steps
Once you know what your state’s rules are, you can start setting up the sales taxes you’re required to collect and pay. Open the Edit menu and select Preferences. Click on Sales Tax, then Company Preferences. Make sure the Yes button is highlighted next to Do you charge sales tax?, then click on Add sales tax item. You’ll see this window:

In states where it’s required, you may have to at least set up a state sales tax item in QuickBooks. You may also be responsible for local (city, county, etc.) taxes.
TYPE should already be set to Sales Tax Item. Enter a name for your tax in the Sales Tax Name field; the Description should automatically appear as Sales Tax. Type in the Tax Rate (%) and the name of the Tax Agency that will collect it (select <Add New> if it’s not there already). Click OK to return to Company Preferences and continue to define additional tax rates. If there is a sales tax item you use frequently, you can select it from the Your most common sales tax item field.
Tip: Each sales tax rate is considered an Item in QuickBooks. When you have to edit or delete one, open the Lists menu and select Item List. Type sales tax in the Look for box, then Search. Right-click on your target and select your desired action from the local menu that appears.
Sales Tax Groups
When you want to combine multiple sales taxes as one item (state, county, etc.), click Add sales tax item again in Company Preferences and choose Sales Tax Group. Enter a Group Name/Number and Description. In the table below, click the down arrow in the field in the TAX ITEM column. Keep selecting individual tax rates until you’re finished, then click OK. When you use one of these groups in a transaction, the customer will only see the total tax, but reports will break them down into their individual parts.
Completing Your Preferences
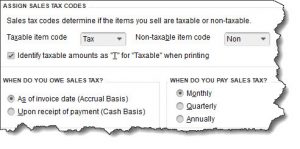
The bottom half of the Company Preferences screen needs more information.

It’s important that all the entries at the bottom of the Company Preferences screen are correct before you start working with sales taxes in QuickBooks.
The first two items here are simply field labels that will appear in transactions to indicate whether or not a line item should be taxed. You should leave them as is; they’re automatically created by QuickBooks. If you want to Identify taxable amounts as “T” for Taxable when printing, click in that box to make a checkmark.
Is your QuickBooks company file set up on a cash or accrual basis? Click on the button in front of the correct choice. WHEN DO YOU PAY SALES TAX is a question that will be answered as you’re learning about your state’s sales tax requirements. When you’ve completed this section, click OK.
Assigning Tax Codes
As you create item and service records in QuickBooks, you’ll be asked to indicate whether or not they’re taxable. The Tax Code field appears at the bottom of the window, like in the image below.

You’ll need to designate every item or service you sell as taxable or non-taxable.
There’s much more you need to know about collecting and submitting sales taxes, like how to work with transactions and reports. We’ll cover those topics next month. In the meantime, let us know if we can help you set up your QuickBooks company file for this complex task.
SOCIAL MEDIA POSTS
Do you need to collect and pay sales taxes on items and/or services you sell? QuickBooks can help with this task.
Don’t know what the rules are about collecting sales taxes in your state and local area? Google your state’s Department of Revenue then find out how QuickBooks can help with this task.
Did you know sales taxes are considered Items in QuickBooks? You can see your options and start creating them by going to Edit | Preferences | Sales Tax. Find out more here.
Taxing agencies often perform sales tax audits. Would you be prepared if you were the subject of one? We can show you how QuickBooks can help.
