- September 1, 2025
- Posted by: TheQBC
- Category: QuickBooks Desktop
QuickBooks’ sales forms, like invoices and statements, were designed for specific purposes. Are you using them correctly?
If you’ve ever done your accounting manually, you probably remember what a pain it was to produce clean, clear, professional-looking sales forms. Maybe you ordered blank forms from an office supply store or even just typed them up on a typewriter. Word processing certainly made that chore easier, and your forms looked better. But the process still required a lot of work, and you had to incorporate each one into your accounting system so you could track it.
QuickBooks has made that chore easier. As you enter and save sales forms, they’re automatically stored in the software. You can customize their appearance to make them more attractive and uniform, and add logos to reinforce your brand.
If you’re fairly new to QuickBooks, though, you may not be absolutely clear on which forms are used for specific situations. We’ll go over them in this month’s column.
How Are Invoices Used?
Invoices are probably the most commonly used forms. You’ll create and send these when you’ve already sold a product or service to a customer. They’re easy to complete, especially if you’ve already entered records for customers and products/services in QuickBooks.
To create one, click Create Invoices either in the Customers menu or on the Home Page. Select your Customer: Job from the drop-down menu in the upper left corner or <Add New>. The Date and Invoice # should appear automatically, as should the Terms and Due Date, though you can change these if you want. Then just select your products and/or services sold from the drop-down list under Item. The Description and Rate will appear in those respective columns. You simply enter the Quantity and change the Tax status if necessary. Add a Customer Message (optional) and check the numbers in the lower right corner for accuracy. When you’re satisfied, save the invoice and send it.
Note: Haven’t set up sales tax for your QuickBooks account yet? We can help with this.
When Are Sales Receipts Used?
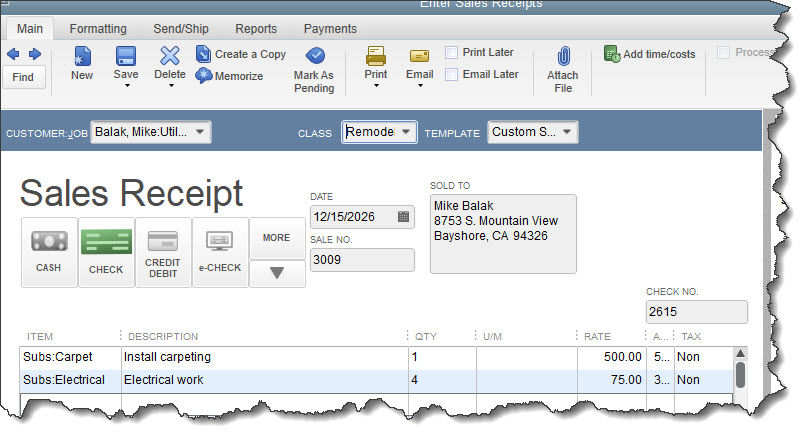
Create a Sales Receipt when a customer pays you immediately for a product or service.
You may never have to issue a sales receipt, depending on the type of business you run. If you do, click Create Sales Receipts in the Customers menu and fill it out much the same way as you would an invoice. You might need sales receipts if, for example, people come into your shop to purchase items, or you send workers out on jobs, and you know what the charges will be, so you can prepare the sales receipt ahead of time.
When Would You Create an Estimate?
You’ve probably received estimates before, for things like vehicle repairs or remodeling work on your home. You can create your own in QuickBooks to give customers a ballpark figure for what you’d charge for specific products or services. It’s not a bill, but rather a description of what you’re proposing to charge for what they want.
Go to Customers | Create Estimates. Select a customer from your list or add a new one, then select the items from the lists of products and services you’ve already created. Your customers can accept your estimate, request changes, or reject it. If an estimate has been accepted by a customer, you can have QuickBooks convert the estimate into an invoice.
TIP: Your QuickBooks installation may not have a field for Due Date on the estimate form, but you can add this as an “expiration date” for estimates. We can show you how to customize forms.
Do You Need to Send Statements?
Do you have trouble with customers paying late and you’re tired of sending reminders? Or has a customer requested an accounting of their transactions over a designated period of time? QuickBooks provides tools for creating Statements, which are forms that do the latter. They’re simply comprehensive lists of invoices and sales receipts, and payments.

Statements are comprehensive lists of sales transactions that occur between you and your customers over a specified period of time.
As you can see in the above image, statements are very flexible. You’d click Create Statements in the Customers menu to open a window like the one above. Check the Statement Date to make sure it’s the date that you want to use for determining which transactions will be included, which may or may not be the current date.
You have two options for determining which customers and transactions will be included. You can:
- Set a date range and include transactions between those two dates, or,
- Include open transactions as of the statement date that are over [x] days past due.
Next, you’ll select the customers you want to include. Should statements go to All Customers whose history fits the range you just defined? Multiple Customers? One Customer? There are additional options in the right column of this window, like whether you want to show invoice item details on the statements. Go through all of these and indicate your preferences. That done, you’ll be able to Preview the statements and Print or E-mail them.
Note: There’s also a link in this window that allows you to Assess Finance Charges. If this is something you’d like to consider, please schedule a session with us to go over this complicated tool.
Use The Right Tool for the Job
If you’ve been using QuickBooks for a long time, deciding which form to use in a particular situation is probably something you know well. But we hope new QuickBooks users now understand the importance of using the correct sales form as you communicate with customers about what they owe you (and why). You should also know that we’re available to answer questions about how you can most effectively use QuickBooks in your business. Just make an appointment and we’ll get started.